5 Gallon Watering Rock Directions
1. It is important to place the rock in an area in your garden so that the drip lines are flat to downward sloping. The flow of water uses gravity and water pressure in the container to push it through the lines.
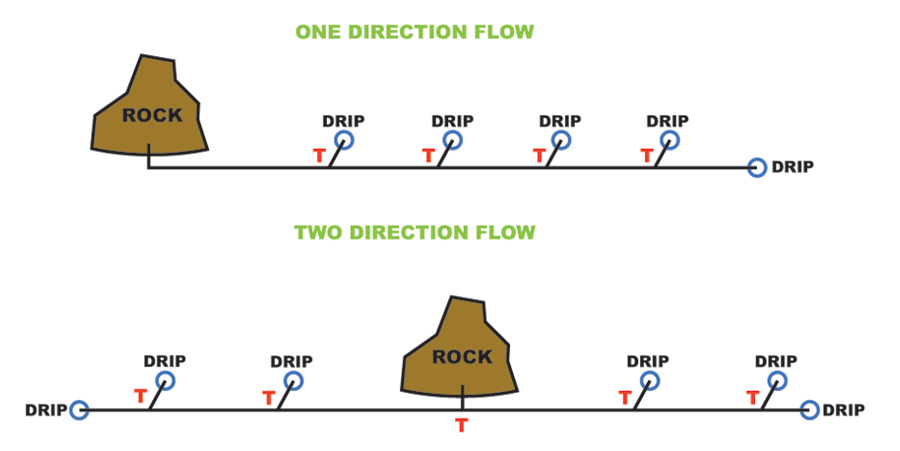
2. Thread the threaded end of the barb into the connection located at the bottom of the back of the rock. Gently thread the barb into the hole on the bottom of the back of the rock. Threading the barb into the rock as much as possible makes the barb stronger but be careful not to overtighten as the barb can break. Attach the drip line to the unthreaded end of the barb and run in the direction you choose. Use cuttings from the provided 15 feet of tubing and T barbs for branches to the plants. If you need more line it is available at most garden centers.
3. Attach adjustable drippers to the end of branch lines. Place drippers near the plant. We also suggest making a small hole near the plant for the water to drip into for deeper water penetration.
4. Use 1/4″ tubing stakes to hold tubing in place.
5. To run the line in two directions, use a 1/4″ T connector to branch off into two separate directions. See Diagram.
6. Remove vented plug and fill rock from the hole in the top of the rock.
7. Adjust drippers to desired flow. When first filling the rock give the water a few minutes to reach the drippers. When first filling it may be necessary to unscrew the end dripper all the way to purge lines of air.
8. Drain rock and blow out drip line or make sure they are drained for the winter.
Watering Rock Diagrams:
Hanging Basket/Planter/Pot Watering System
Step1. Set up your Watering Rock(WR) using WR directions. The WR must be higher than the pump fill holes to allow the gravity drip from the WR to the pump. Set up 1 or 2 lines from the WR to run to and drip into any of the holes located on the pump.
Step2. Make sure the pump is sitting as level as possible. Attach the 4inch piece of 3/8” tubing to the 3/8” barbed valve on the top of the pump and secure with metal 5/8inch metal screw clamp included. The other end of the 3/8” tubing has the 1/4inch barb to hook to the 50feet of 1/4inch drip line. Attach the 50’ of 1/4” tubing to the 1/4” barb.
Step3. Run the 1/4” drip line to the areas and plants you want to water. Where the plants you want to water are, cut the 1/4” line, attach a T barb, cut the desired length of 1/4” line from the 50’ of line and attach to T barb to run to plant. Attach the adjustable connector to the end of the run. There are 4 T barbs and 5 adjustable drippers. The 5th adjustable barb is attached to the end of the line which should end at the last plant to be watered on this line.
Adjustments
1.Adjust the drip from the WR to the pump to achieve the desired frequency of fill ups for the pump container and subsequent auto turn on creating 1 watering cycle. Each cycle pumps 3 cups of water. The faster the WR drips are set the more cycles and water will be distributed to your plants. The faster the cycles run the sooner you will need to fill the 5 gallon WR. You can also have other lines from the WR running on gravity to other plants.
2.Adjust each adjustable dripper on the pump line to your desired level of drip for that plant. FYI, if you increase the drips for some plants it will reduce the water to others due to the cycle ending sooner.
Cover the Pump if Necessary
Your pump comes with a limited warranty. But the pump motor needs to be protected from rain and moisture. This is the only pump I could find with enough lift, 15feet. It is also the best choice for automatic on/off and a built in holding tank. Other options were complicated with additional components like a holding tank, on/off timers, at additional costs. This pump is the best choice, with the best power, with the most simplicity of use, at the best cost.
To protect your pump use the enclosed plastic bag included to cover the pump motor loosely.
You can also use other ideas and products to cover your pump. You can place it on a covered porch, use a faux rock, use a 2.5 gallon water carton from any store cut to fit over the pump. Whatever you use make, sure you allow air to get to the pump to help keep cool and allow the pump to breathe.